Key Management
|
|
|
Bring Your Own Key
Bring Your Own Key (BYOK) enables system administrators to own and control the encryption keys used to protect their SQL Databases. Keys are stored within a dedicated, hardware security module (HSM)-backed Key Vault. Access to this Key Vault is restricted so it may only be accessed from OneStream Cloud environments.
Enabling and disabling BYOK gives you the choice to manage your own keys or to allow keys to be managed automatically by the service.

Enable Key Management
To enable BYOK:
-
Click Upload.
-
Select a .pfx file.
NOTE: Users on Platform 8.0 or above can choose to upload .pem files.
-
Click Open.
-
Your key is uploaded directly to the Azure Key Vault and the uploaded file is automatically deleted.
Key Information
Select a key to view its:
-
Name
-
Status
-
Azure thumbprint ID
-
Activation Date
-
Expiration Date
Disable Key Management
Disable key management by clicking the Disable BYOK button. BYOK will be disabled and your data will be managed by the service.
Refresh
|
|
This refreshes information in the grid. |
Certificates (Available Only with Platform 8.0)
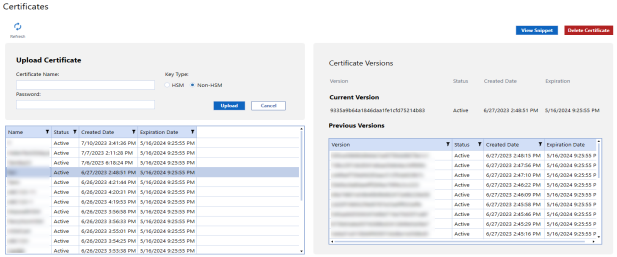
Certificates and their corresponding keys can be used for more secure authentication to APIs, FTP servers, and other integrations. Each certificate contains a thumbprint ID that can be used in the Azure configuration tiles to identify which key is in use. The certificate interface enables system administrators to securely store these for later use in business rules.

Upload Certificates
To create a new certificate:
-
Enter a certificate name.
NOTE: Certificate names should be 127 characters or less.
-
Under Key Type, select HSM or Non-HSM.
NOTE: HSM is a physical device providing extra protection for sensitive keys. Using an HSM will permanently prevent exporting the private key in the future.
-
Enter a password.
-
Click the Upload button.
-
Select a .pfx file.
-
Click Open.
Certificate Versions
Select a certificate to view its status, creation and expiration dates, current version number, and previous versions.
Refresh
|
|
This refreshes information in the grid. |
View Snippet
Click the View Snippet button to retrieve a sample BRAPI code of the certificate, which can be copied and used in your business rules.
Certificate X509Certificate2
BRApi.Utilities.GetCertificate(SessionInfo si, string certificateName)This BRApi is used to access a certificate or key from within a business rule to load it into memory. It cannot be used with HSM backed keys.
Certificate Signature String
BRApi.Utilities.Sign(SessionInfo si, string keyName, string algorithm, byte[] digest)This BRApi is used to generate a signature using a key stored in the key vault without extracting the key. This can be used with both HSM and non-HSM backed keys.
Remove Certificates
The Delete Certificate button enables you to delete a certificate.
NOTE: After you delete a certificate, you cannot reuse the same certificate name for 90 days.
Secrets (Available Only with Platform 8.0)
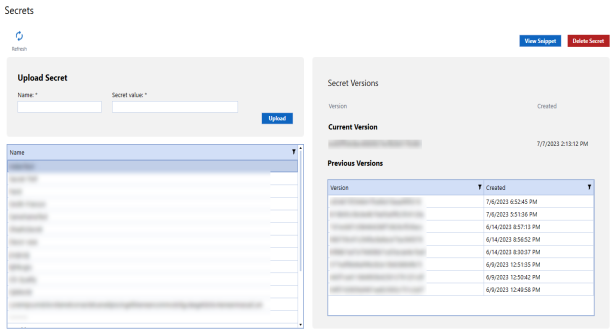
Secrets enable system administrators to securely store sensitive information like passwords, API keys, or connection strings for later use in business rules.

Upload Secrets
To create a new secret:
-
Enter a secret name.
NOTE: After you delete the name of a secret, you cannot reuse the same name for 90 days.
-
Enter a secret value.
-
Click the Upload button.
Secret Versions
Select a secret to view the current version number, previous version number, and creation dates.
Refresh
|
|
This refreshes information in the grid. |
View Snippet
Click the View Snippet button to retrieve a sample BRAPI code of the secret, which can be copied and used in business rules.
Secret Value String
BRApi.Utilities.GetSecretValue(SessionInfo si, string secretName)Remove Secrets
Click the Delete Secret button to delete a secret that is no longer in use.